Tag Archives: Stencil

Will it be Flora or Fauna?

As you have seen, H2H Challenge Blog does challenges twice a month.  If you haven’t played along yet, you really should!  The prompts are great, and the artwork is pretty splendid as well!  The second challenge for April is Flora or Fauna.  That leaves so many different options!  You can do almost anything with this!


So, I decided to go with Flora.  My card is more of a masculine card, even though it has flowers and butterflies on it.  (Guys do actually like flowers, too!)

This is called a Bookbinding Card.  It is sealed at the far right, with a ‘lip’.  (as opposed to the normal fold)  It gives you a smaller space to write on the inside, but that’s ok too, sometimes!


I stamped on the charcoal piece with white craft ink.  Once dried, it comes to this nice almost faded look that I think fits and pairs well with the B&T from In Full Bloom.


The sentiment is heat embossed in white powder, so that it would stand out from the card.

I really like how this card turned out!  Simple and elegant, and can be used for so many reasons, just by changing the sentiment.


Thanks for stopping in to see my card!  I hope you will leave a comment below, for me!


Then, hop over to the H2H Challenge Blog and play along!


Keep being Crafty!

~Michelle

Layered Flowers

Welcome to the Technique blog hop!  This month our focus is on layered flowers!  There are so many different ways that you could do that!  The Layered Flowers Thin Cuts might be the easiest way to do that!  I will link some other projects below, that I had fun making in different ways.  If you are following the hop, you should have arrived here from Michelle’s blog.  If you started here, that’s ok!!  You will continue around in a circle until you get back to here!  I know you will find a bunch of great ideas that you will want to copy!

So, for my card, I used a few different things!  I used the stencil from the In Full Bloom Scrapbooking workshop, the stamped sentiment from the cardmaking workshop, and the layered flowers thin cuts.

I used the stencil a few different times with shortbread ink.  The sentiment is stamped in grape ink to coordinate with the grape cardstock of the flowers.  The leaves are cut from both light and dark sides of sage cardstock.  Tof finish it off, I used some liquid pearls!  (I don’t know about you, but I tend to forget how much I like them!)

I hope that you like the card that I shared today!  I have a short video that you can watch of me putting it together, here.

I said I would link some other cards that I have made thatw ould fit for this blog hop.  I have this card here that shows how to use different colors of cricut cuts for a flower.  This one uses a different style of cricut cuts, that are similar to what I have done today with the large flower.  Last but not least, this is a whole different style, with multiple layers of the B&T paper being cut and layered.

Thanks so much for stopping by!  Next you should be going to Lauren’s blog.  Before you hop away, however, I would love it if you left me a comment about my project!

Have a crafty day!

~ Michelle

CTMH Items used:

{All items are clickable!}

Have you been afraid to use Stencils?

Have you been scared to try stencils, because they might be hard?  Well, you shouldn’t be!  And with this Technique hop, we will give you more than a few reasons why you need to try them!

You should have arrived here from Danielle’s blog, (if you didn’t start here!) and she always has great ideas!  If you started here, no worries!  You will get back around to her blog, as it’s a giant circle!

So, let’s get started on what I have to show you, shall we?

Isn’t this just an adorable card!?!?  (I hope you leave a comment below to let me know what you think!!)  I loved coloring this little guy!  I used my friend’s son as my model for coloring!  (I’m not the best at it, but I think he’s cute!)


Now, the stenciling part.  I started with his hoodie!  I masked his hoodie first, so that I could get an ombre effect on it (which I looooove how that turned out!) and then masked off his arms and pocket, so I could add stripes from the stencil.  I used the card front 3 bundle for the stripes.  (these are all done in bluebird ink.)


Then I decided I needed to make it a bit more!  So, I grabbed the thanks stencil from the card stencil pack 1, picked the upper case A, masked off around it, and used texture paste and silver embossing powder to make an A on the front.  (my model’s first name starts with an A).  I let the paste dry, then heat embossed the A, it gives it some extra dimension!

I took some white daisy cardstock, and stamped the headphones, pizza, cup, donut, TV, and laptop in linen ink to make the background less boring!  I stamped and cut the headphones and cup with their thin cuts, and the pizza I fussy cut (no thin cut for that one!)  I popped up my model, and he is super cute!


I decided I needed a bit more blue, and a bit more silver, as well, so I grabbed a strip to heat emboss the word Awesome in the silver embossing powder, and then the ‘you are’ in sapphire ink just above it!


I used most of the guys stamps, because they are so easy to mix and match!  I even used one of the girls!

To finish off the card, I used the same stencil and same ink (bluebird) to create the stencils on the card base.  I think it ties everything in perfectly!  Now, after you leave a quick comment, head on over to Lauren’s blog!  She has some great stuff! 

Remember to leave a little love on everyone’s post!  We all love crafting, and we love to know that what we show you is appreciated!  

Thanks!  And see you next time!

~Michelle

Seeing Stars!

Do you know that I do a Facebook live every Sunday evening? It is at 5pm pacific time, and I do all sorts of crafty things! I have always had great intentions of putting the photos and dimensions up on my blog after the video, and, well, life seems to always get in the way! So, now I am going to turn over a new leaf, and get them up on the blog on the Tuesday following! So, welcome to the first Tuesday repost of the Sunday live! LOL!!

Click here for the FB Live video!

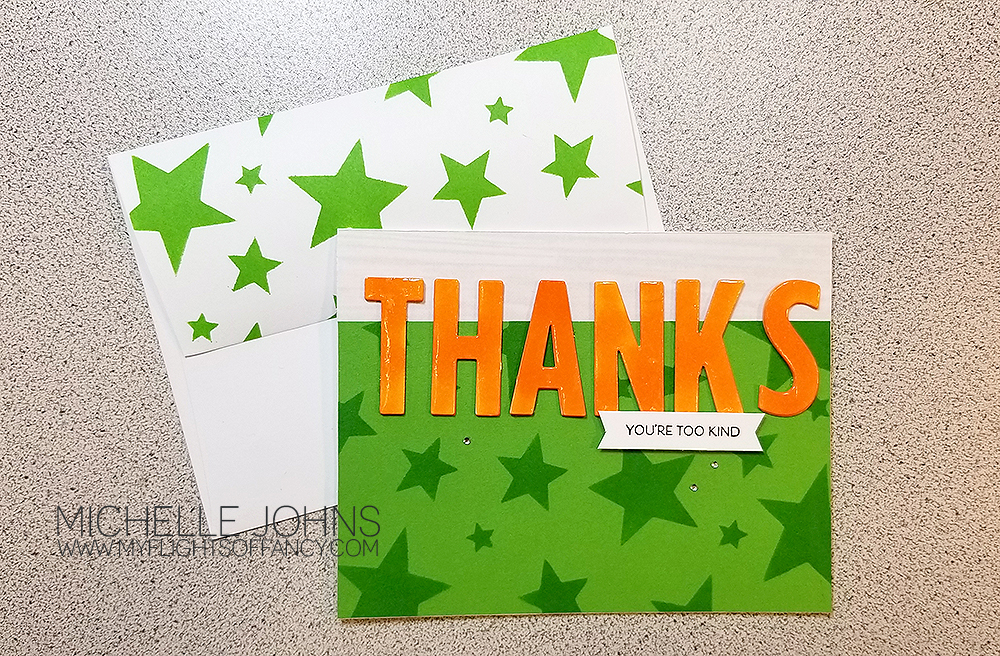
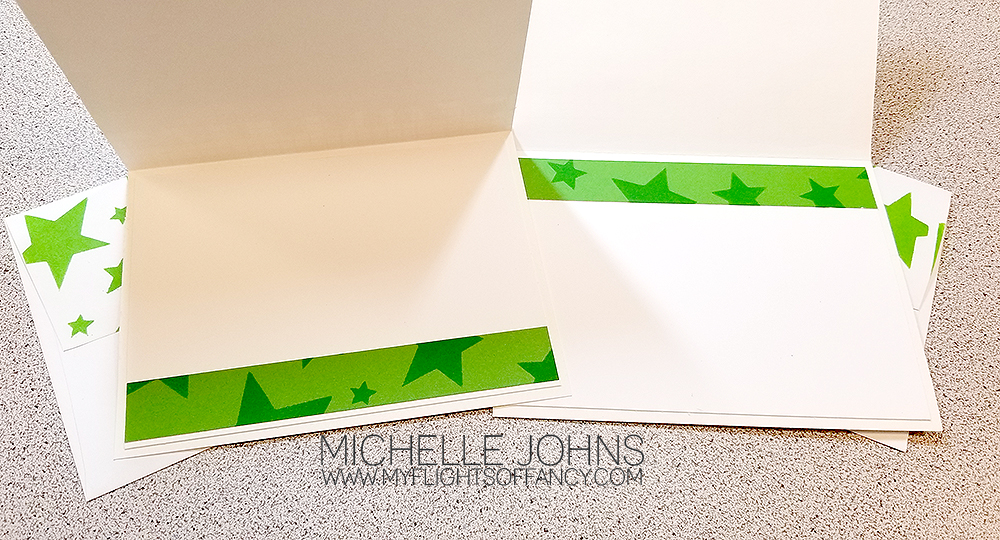
Sunday we were playing with stencils and different things that you can do with them! I have a few examples to show you, and we made a card with one as well! If you want to play along, here is the star stencil that I used. It is on the Artbooking cartridge, so you will need to have that cartridge to cut this stencil. It is slightly different than that image, as I wanted to add a few more stars. So, at the end of the post are the steps that I did to get this stencil, in case you want to try it with one of yours!

We used a variety of mediums in the video, including dye ink, pigment ink, texture paste, & embossing powder. Different things will give you different looks, so you should try them all out!

This card was so fun to put together! And super easy, as well! Maybe a smidge time consuming, but not too bad, overall! I hope that you make one too! Please show me what you make, I love knowing that my tutorials are helpful to you!

Click here for the FB Live video! While you are there, make sure to click ‘like’ on my fb page!

Paper size info:
Willow: 6 x 4 {Trimmed after stenciling to 5 1/2 x 3 1/4 & 5 1/4 x 3/4}
Into the Wild, Wood Grain B&T: 5 1/2 x 1 1/4
White Daisy: 2 x 3/8 & 5 1/2 x 4 & scraps for “thanks” letters

Step by step how to make your own stencil:

1. Open Image: #M3D15D Stars overlay from Artbooking cartridge and make it be 6×6
2. Add Shape>Square to your mat
3. Click and drag square to be slightly larger than your star overlay
4. Select both images and slice
5. Select the grey image that looks like your stencil, and delete.
6. Move the grey stars & outline to the side of your overlay
7. Add Shape>Circle & duplicate it
8. Shrink one circle to fit over just one star in the grey overlay
9. Select that circle and the grey overlay and slice
10. Step 9 will give you 2 grey stars separate from everything.
11. Delete the circle with a start cut from it.
12. Repeat steps 8 & 9 & 11 with the 2nd circle.
13. Select all 4 grey stars, and like with the grey square, click and drag, but make smaller instead of larger
14. Place the individual stars on the original overlay (mine is a lagoon color) in the solid portions of the overlay
15. Select ONE grey star and the overlay, and slice. (you can ONLY slice 2 layers at one time)
16. Delete (or move) both the grey and the lagoon stars. (move if you might want to cut more stars from the overlay)
17. Repeat steps 15 & 16 for the other 3 stars.
18. You are now ready to cut your stencil!

If you don’t want to do all of those steps (looks harder in writing than it really actually is!!), here is the link to my stencil that I am using in the video!

Star Stencil Design Space Link

Products used in the video:
Willow cardstock
Sapphire Cardstock
White Daisy Cardstock
Into the Wild Paper Packet
White Daisy Pigment Ink
Willow Dye Ink
Texture Paste Trio (Transparent Gloss)
Gold Tinsel Embossing Powder
Gold Shimmer Brush
Marigold Shinhan Touch Twin Marker
Liquid Glass
Archival Black Ink
Bitty Sparkles
Block Alphabet Thin Cut Die

I really do love seeing the creations that you guys and gals come up with! Leave me a comment and let me know what you think, and show me what YOU come up with!

Paste-fully Creative – CTMH Technique Blog Hop

Welcome to this month’s Technique blog hop! We are featuring the new Texture Paste! You should have come from Haley’s blog, however, if you didn’t, it’s a circle, and you will get back to her!

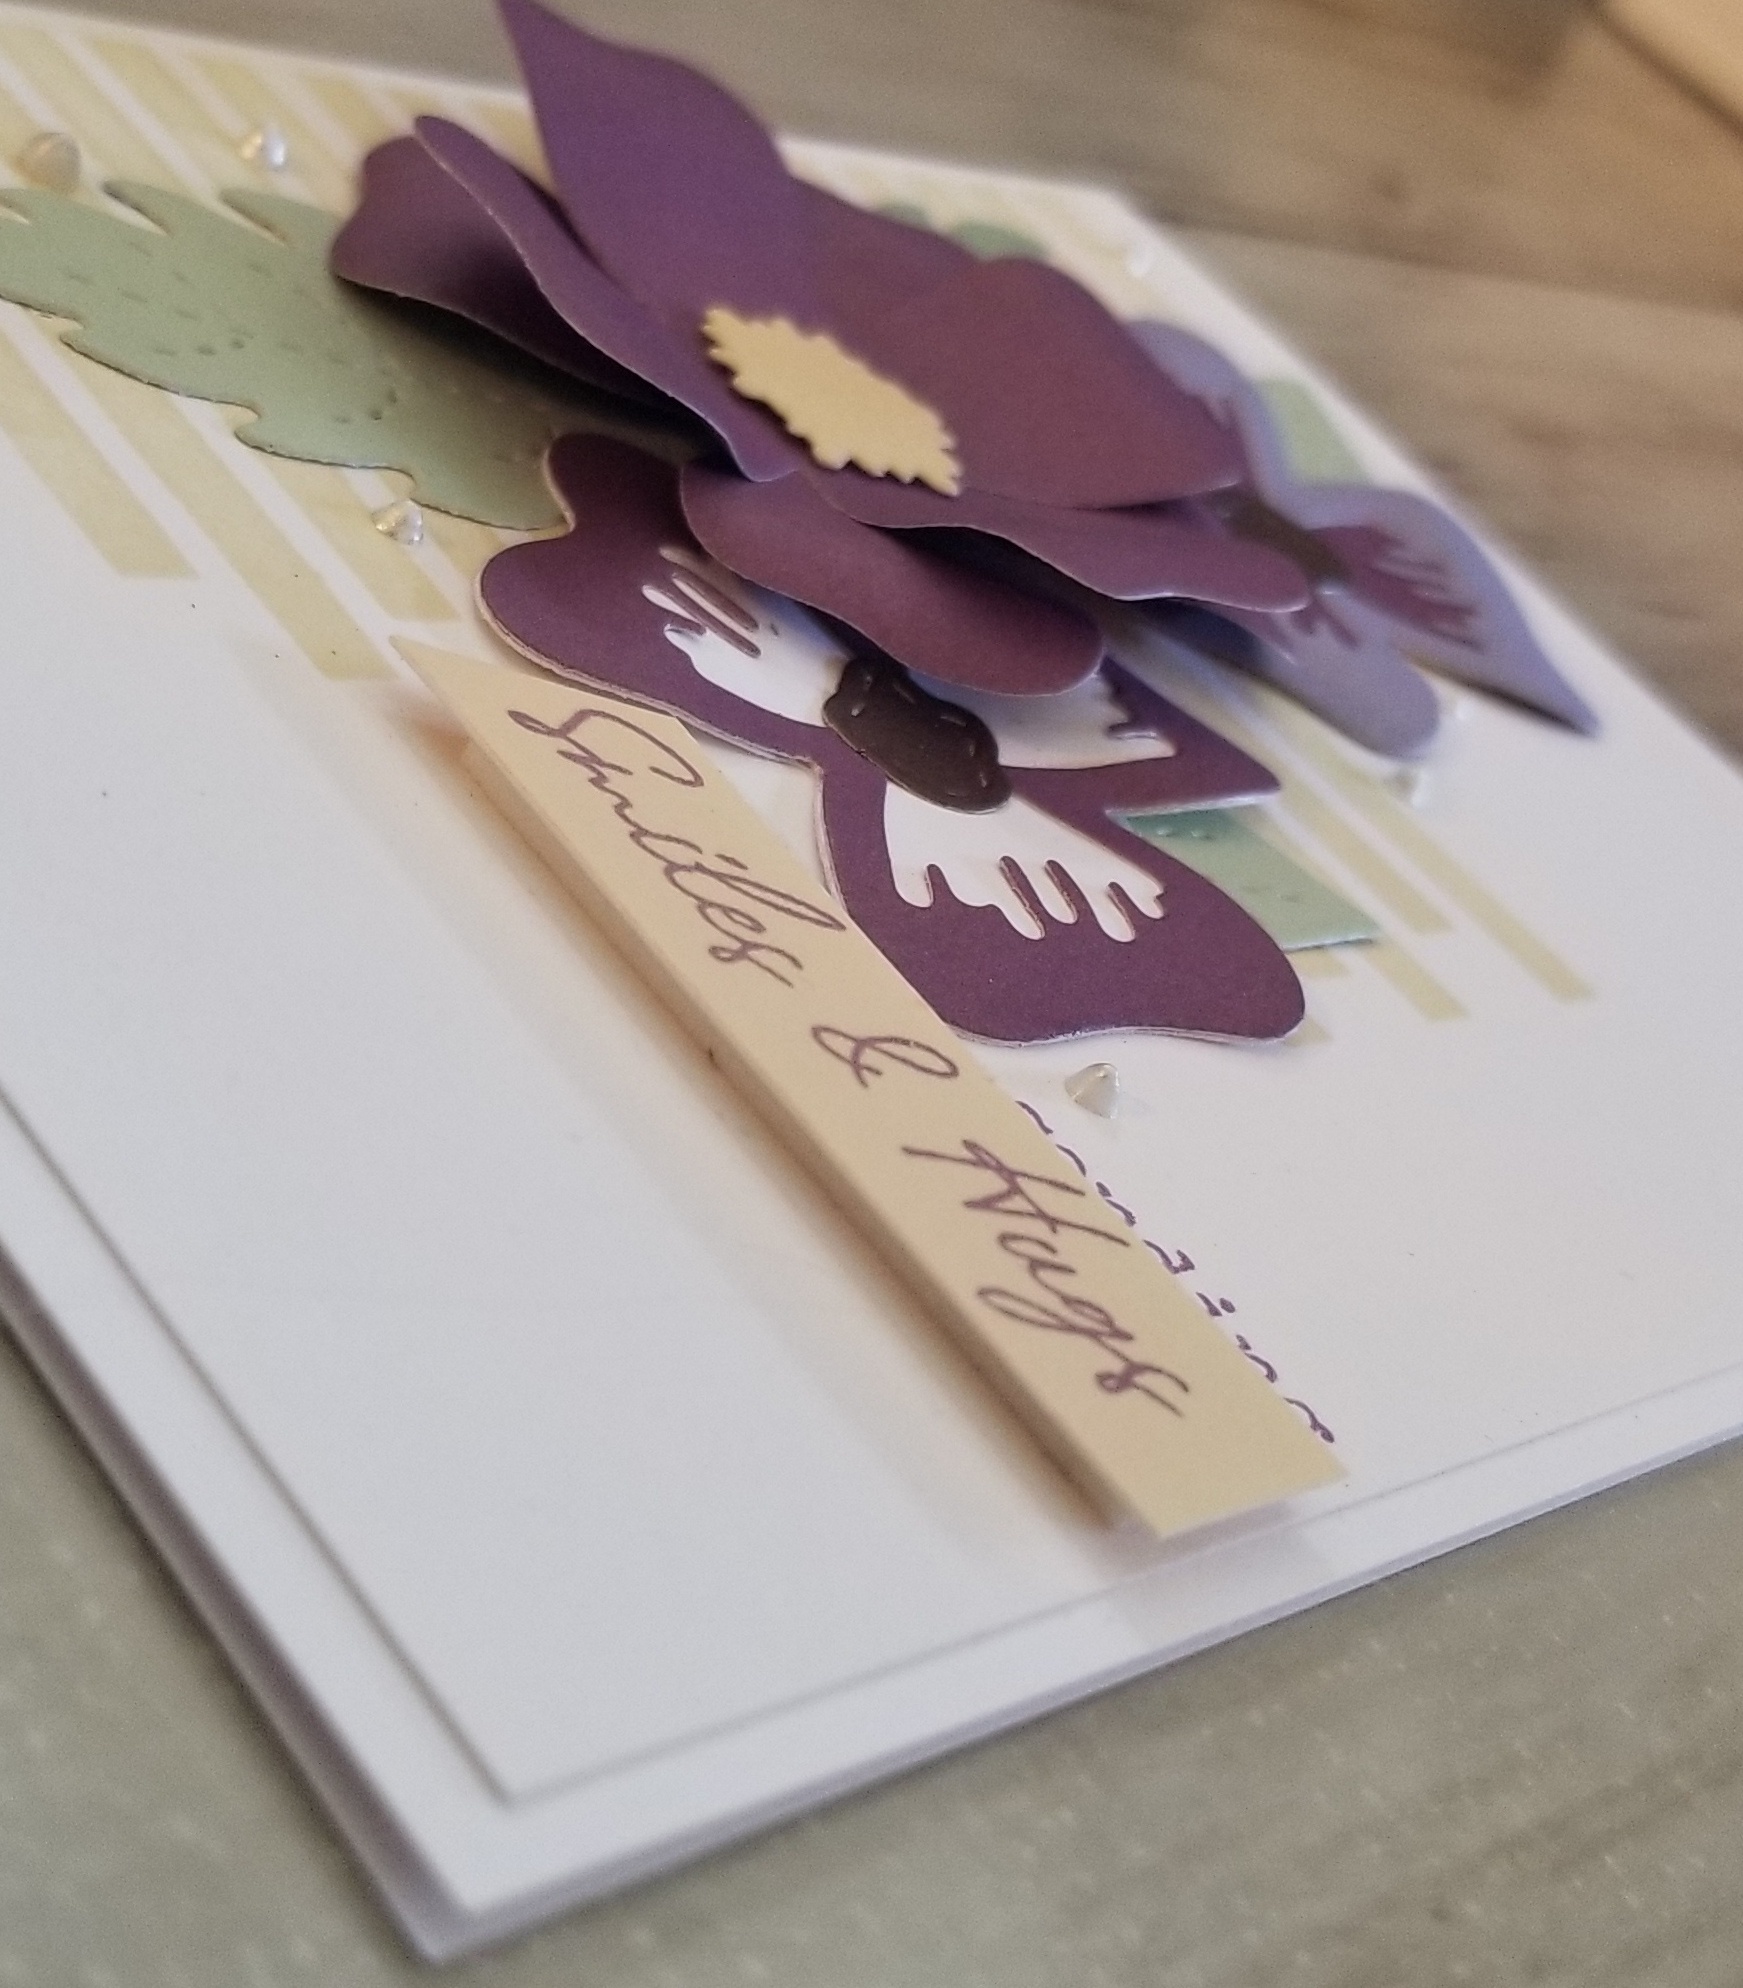
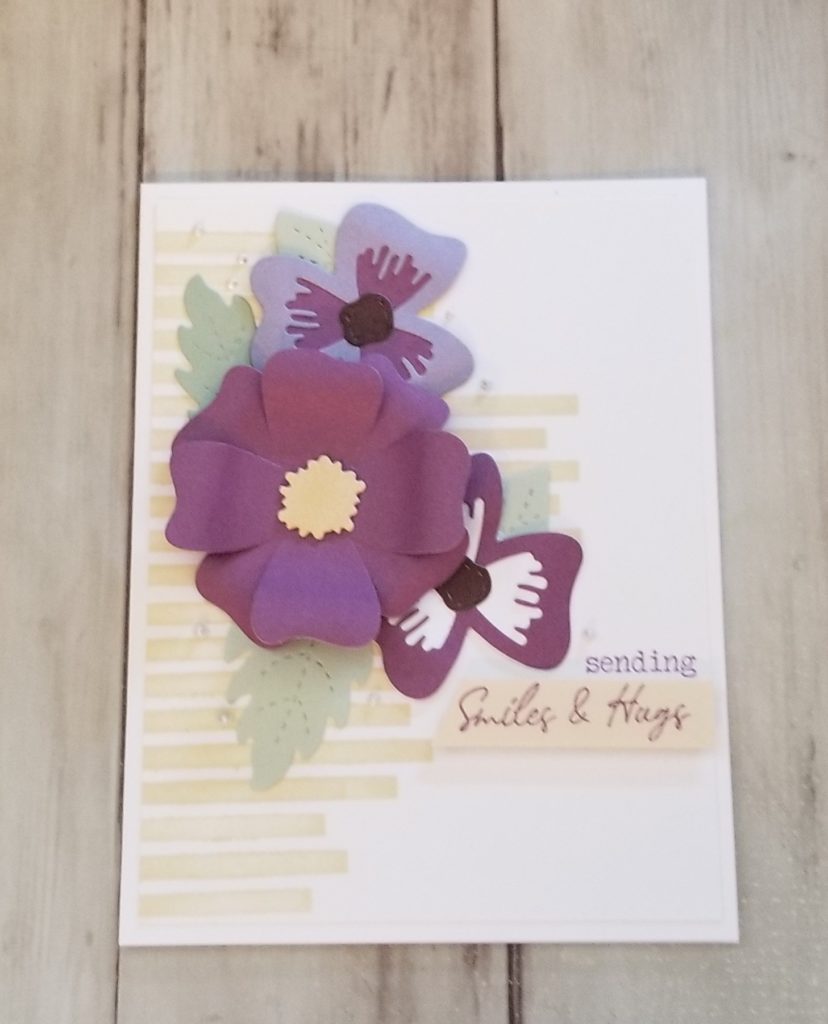
Today, I have this fun card for you! It was really fun to make, even if it wasn’t what I was originally going to do!

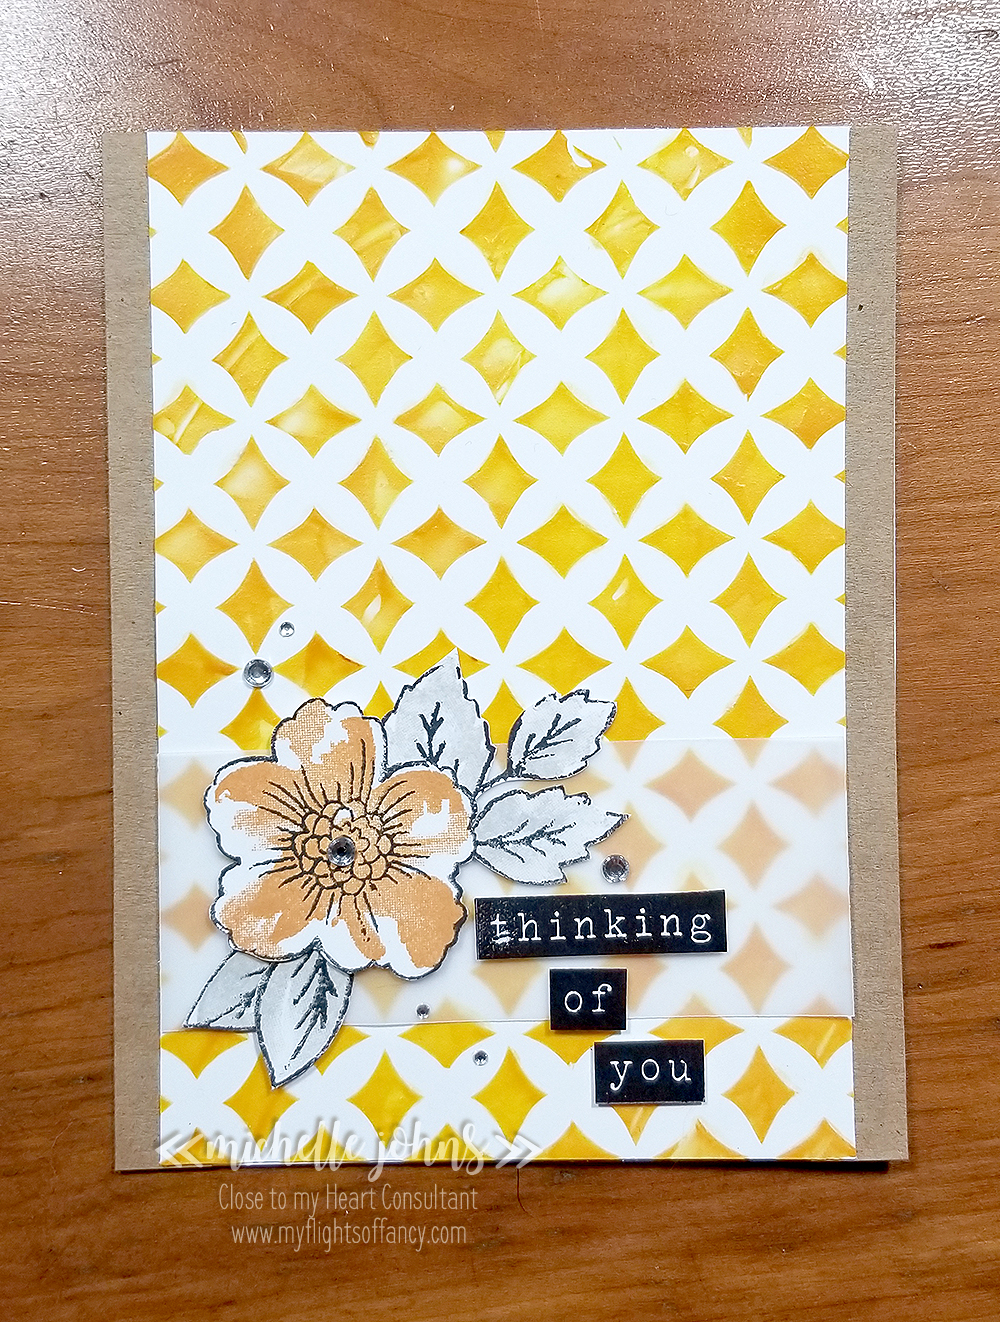
I cut a fun stencil from the Artbooking cartridge. I just used a bit of cardstock for it, but I would surely next time go with the stencil sheets, as you can see a bit where it smooshed under.

I put some saffron and goldrush inks onto the All Purpose mat, then put a little dab of the Transparant Matte paste into each. Mixed them slightly, and then spread onto the card in different spots with the palette knives, and then slightly overlapped them. I peeled off my stencil and allowed the paste to dry.

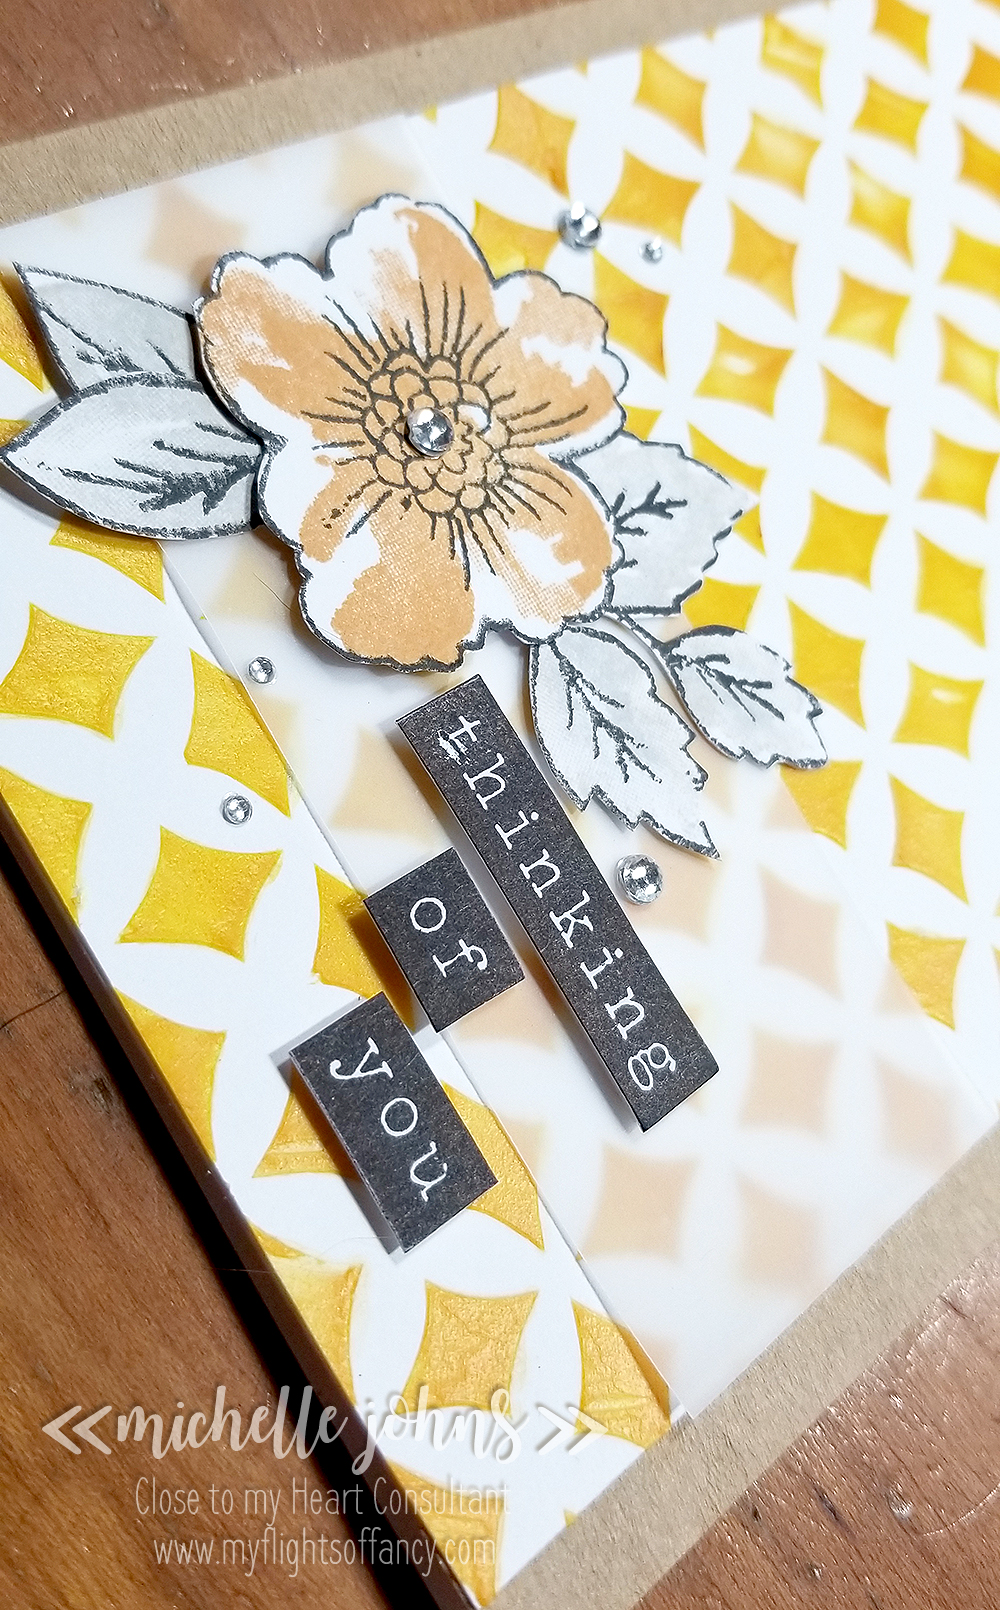
I stamped and cut the flowers and sentiment from the bunches of love stamp set, using archival black, mink, saffron, and goldrush colors. Popped them on a scrap of vellum, to help them pop off the card a bit more, and viola! You have a fantastic card! Oh, and let’s not forget the bling, shall we? I used a few clear sparkles and bitty sparkles do draw a bit more attention to the flowers!

Thanks for stopping by! I hope you liked my card! Let me know what you think! Then, hop on over to Michelle’s blog to see what she has for you!