Tag Archives: Card

Three on Thursday

Its a new year and with that comes a new Three on Thursday! This week’s class has some adorable cards, and many of the stamps you may already have in your stash! Each week I do a YouTube Live video, and I make three cards for you. This is what we did this week! Let’s take a look, shall we?

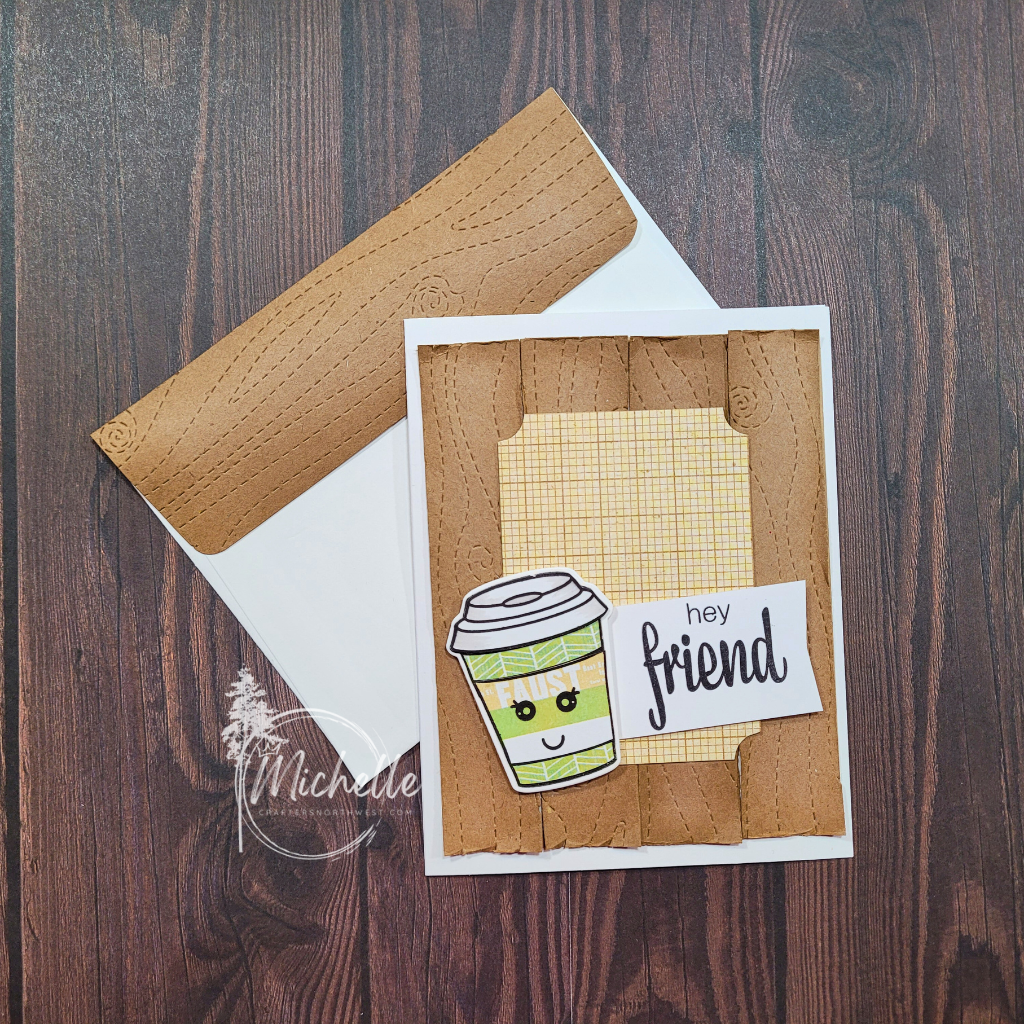
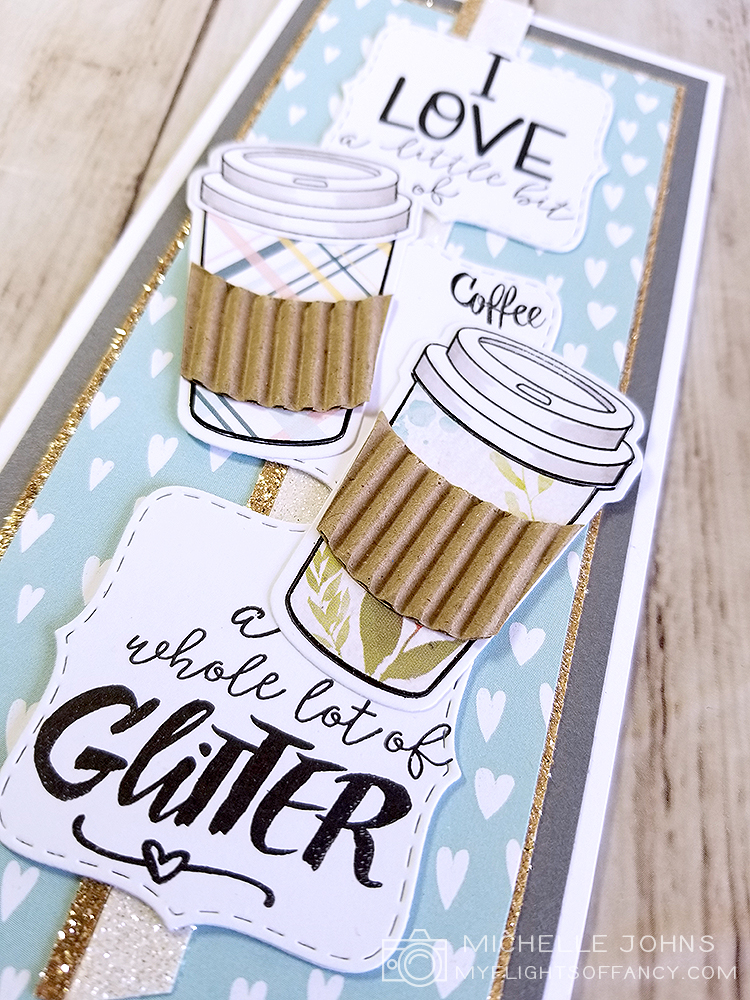
Isn’t this card just adorable? I have always loved the little faces, but never used them, because they were individual, and I was afraid that I would make them look wonky! This card was inspired by a card done by Jodi Collins, and of course, I had to put my own spin on it!

There is some paper piecing involved with the coffee cup, but it is super easy to do, and it just looks so cute! I love the detail on the wood planks!

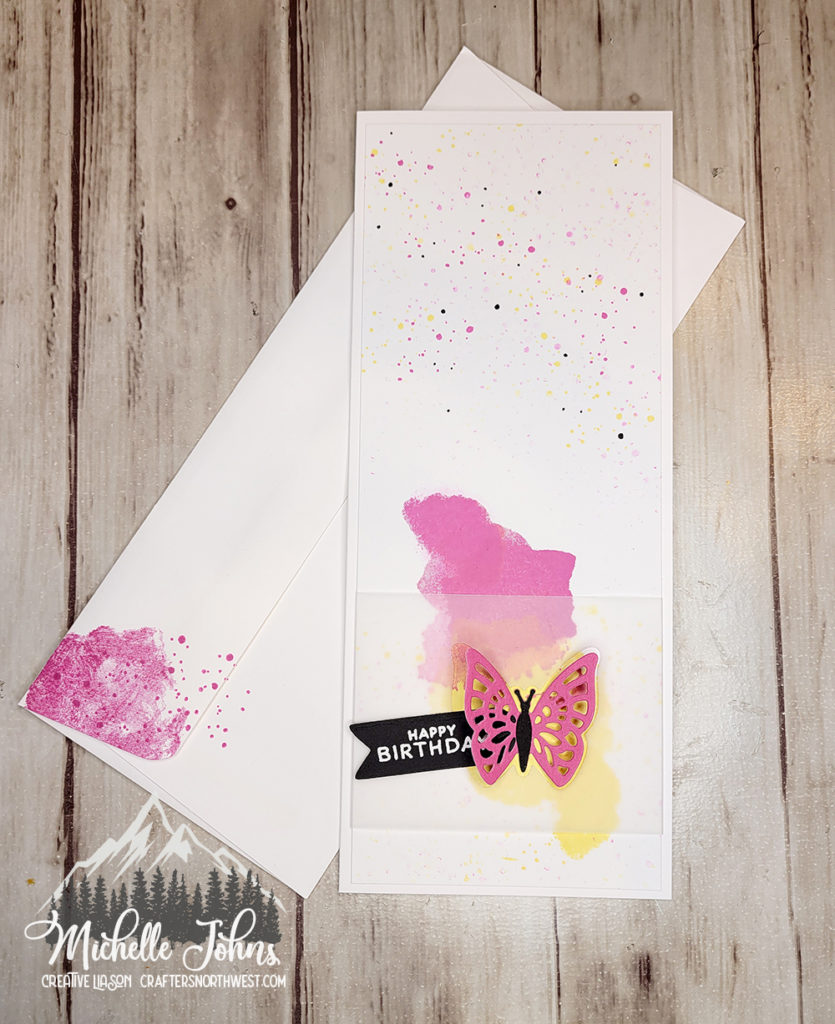
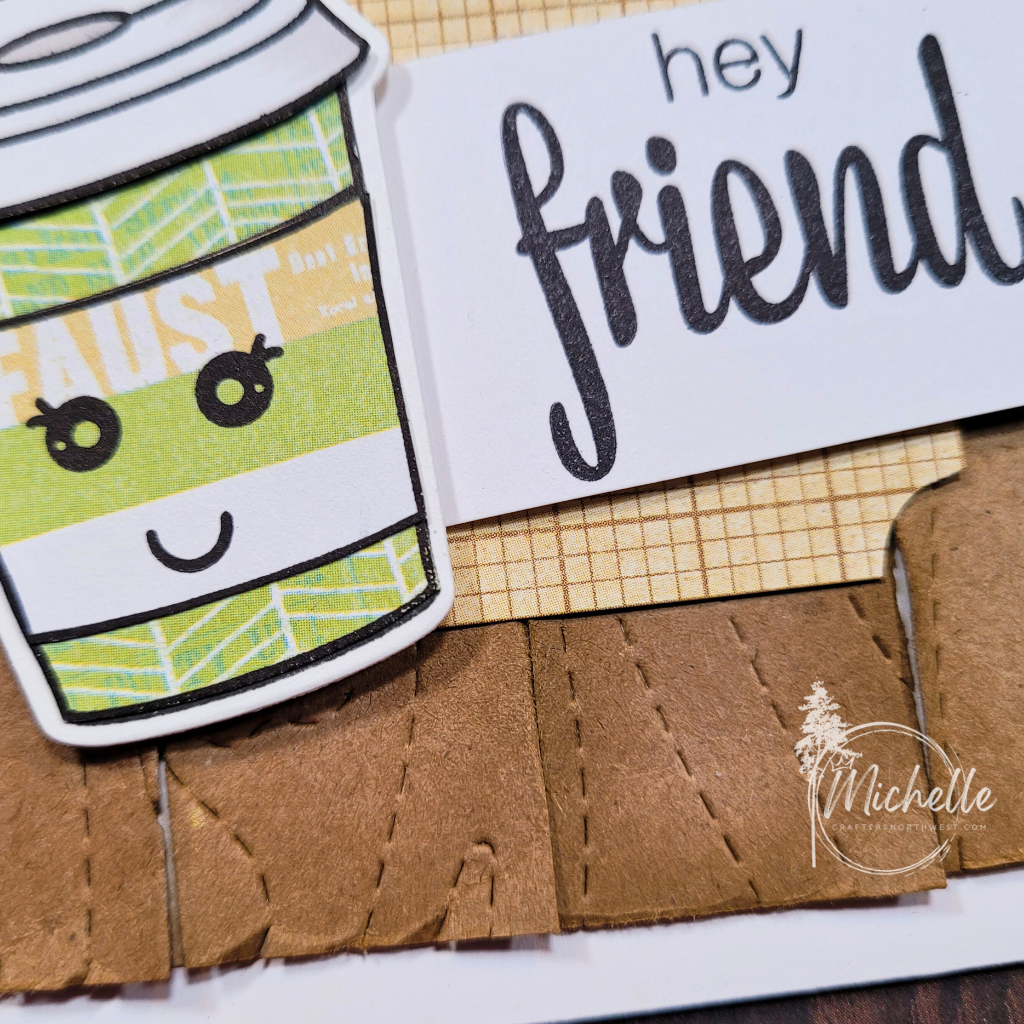
And, of course, we can’t forget the inside! I don’t normally stamp a sentiment on the inside, but this card just screamed for something more! So, stamp I did! It’s fun to pair different stamp sets together, don’t you think?

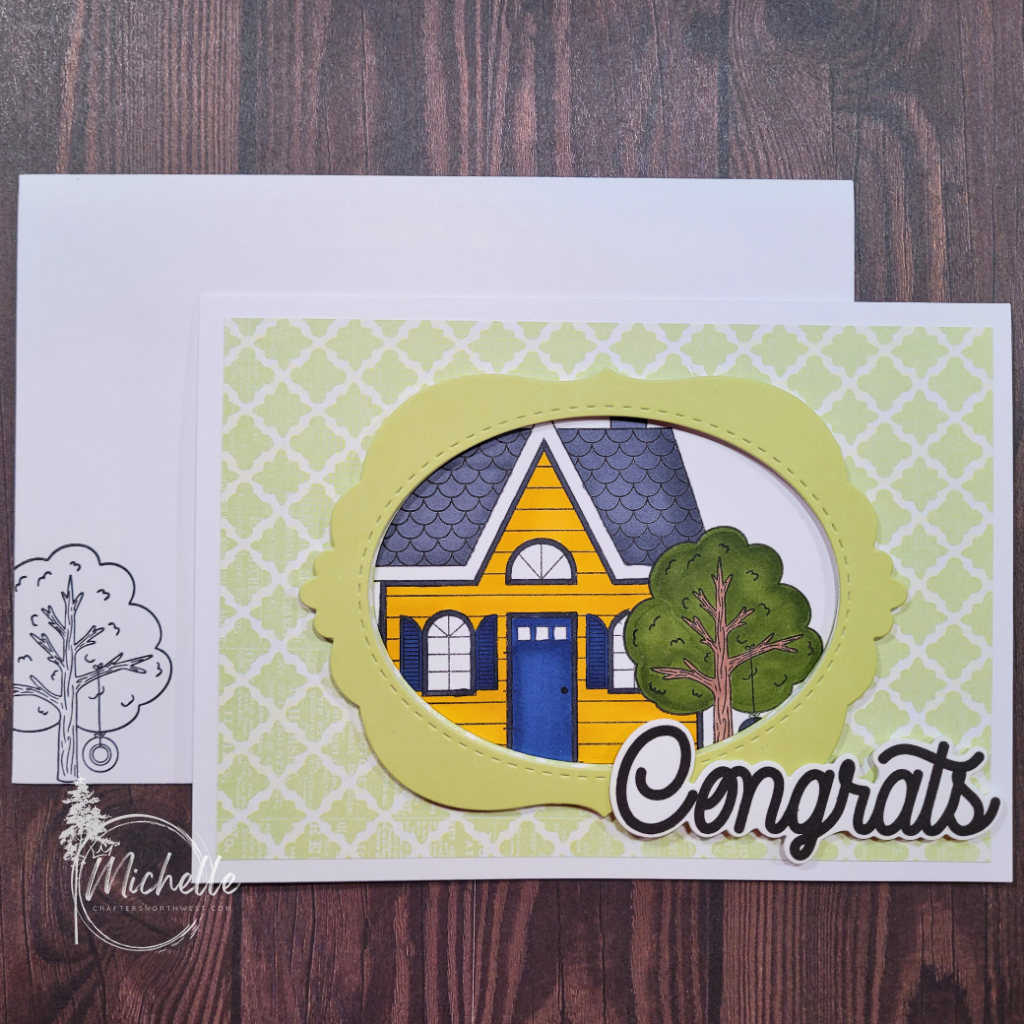
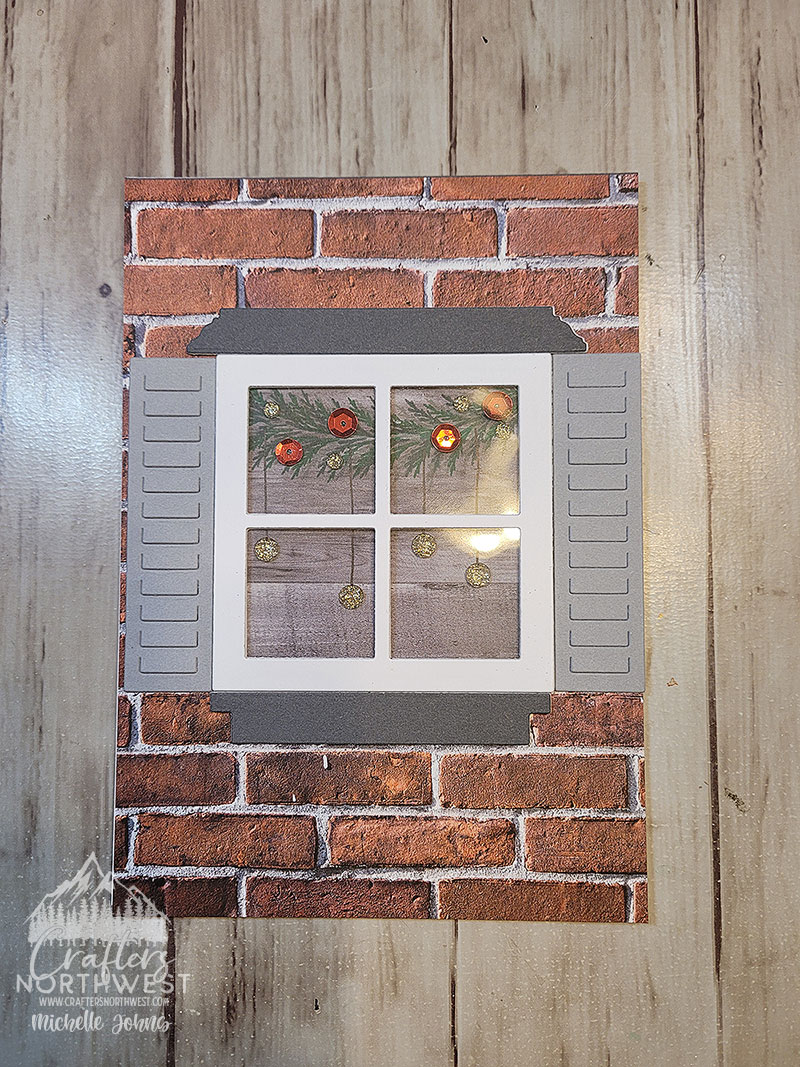
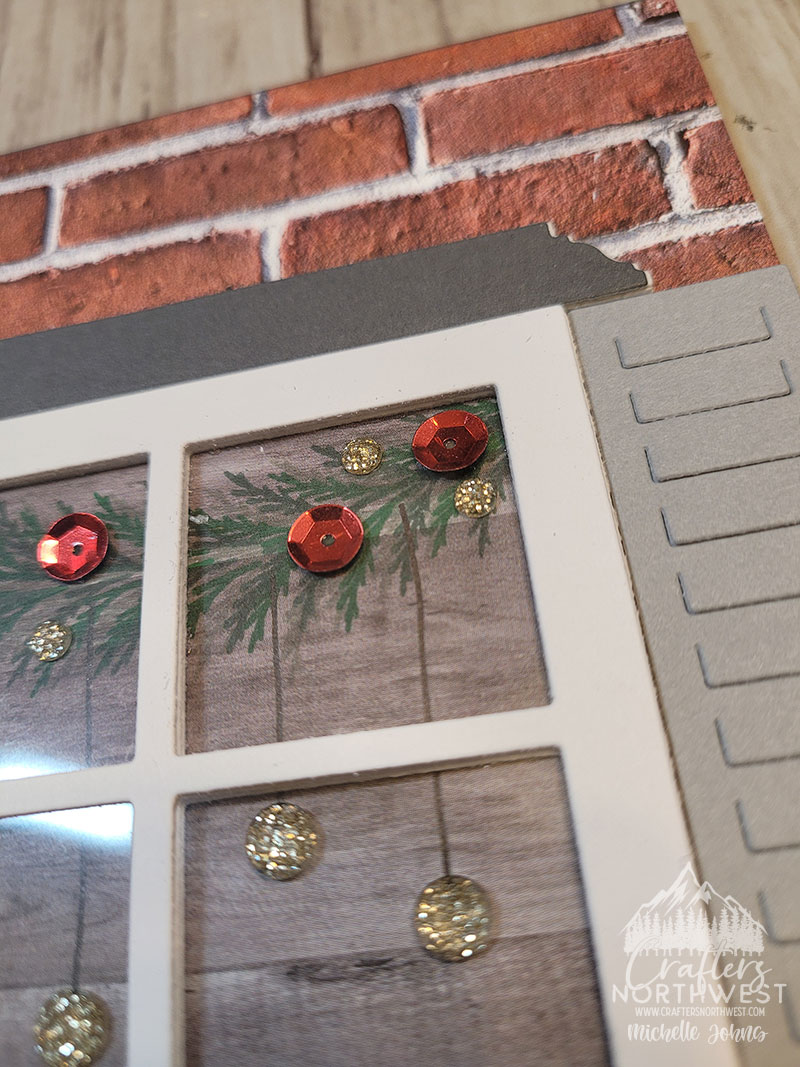
I have a realtor friend who shares houses all the time, and I love it when she shares the congrats pics and all the fun doorstep drops that she does! So, this card is dedicated to her! The design itself is inspired by a few different cards, by Janne KE, Brenda Rose, and Kelly Baxter. (I almost wonder if I should have put some string on it to make it look like an old fashioned hanging framed photo, what do you think?)

The coloring was super fast, as I didn’t do any shading. Just a few markers, and you are done! I love that even with this paper, you could totally make this house a different color!

Of course, you can’t forget the inside, nor the envelope! Just quick little bits and it just makes everything 100 times better! So simple!

Last, but not least, we have this super fun card! This is definitely old paired with new! I really wanted to go for that flying banner look, and I think I nailed it!

Different layers of foam tape make the plane pop out between the clouds!

And, of course the inside and envelope!

I hope that you have enjoyed this week’s cards! I have listed all of the supplies below. If you have any questions that aren’t answered in the video or this post, please let me know, and I will be happy to answer them for you!

Michelle's Signature

Coffee Card:

Skylark Paper Pack

White Daisy Cardstock

A2 Card Bases & Envelopes

Desserts a la Whirl Z3957

Hey Friend B1845

Slimline Stitched Card Front & Background Z4651

Black Lepen

Brown Grey Blend TriBlend Marker

Blending Brush

Toffee Ink

Intense Black Ink

Tombow Mono Air Adhesive

Glue Dots

Foam Tape

Thin Foam Tape

2×2 Acrylic Block

1×3 Acrylic Block

House Card:

Skylark Paper Pack

White Daisy Cardstock

Limeade Cardstock

5×7 Card Base & Envelope

Memory Lane

Home Sweet Home Z3755

Howdy Neighbor Z3918

Oval Frame Thin Cuts Z4295

Intense Black Ink

Tombow Mono Air Adhesive

Shaker Window Foam & Acetate – Oval Z5031

Red Brown Blend Tri-Blend Marker

Gold Yellow Blend Tri-Blend Marker

True Blue Shades Tri-Blend Marker

Dull Green Blend Tri-Blend Marker

Ice Grey Shades Tri-Blend Marker

3×3 Acrylic Block

Misti Stamping Tool

Plane Card:

Skylark Paper Pack

White Daisy Cardstock

Slimline Card Base & Envelope

Dreams Take Flight Z3703

Looking Forward – January 2024 SOTM

Intense Black Ink

Tombow Mono Air Adhesive

Fancy Borders Thin Cuts Z3682

Foam Tape

Thin Foam Tape

2 x 3 Acrylic Block

1×3 Acrylic Block

What kind of card do you get with White Daisy Cardstock and Thin Cuts?

This week’s challenge over at H2H is all about the thin cuts!  Well, let me share with you a card that is ONLY white daisy cardstock.  (well, and three white dots for embellishment . . )  The card came together really rather easily!!

I used the postage frames thin cuts to get my frame.  Then I took the inside piece, and used the decorative texture background thin cut to get all those itty bitty dots and petals cut out of the center . . . AFTER I added some distress oxide to it.  I used Mustard Seed, PIcked Raspberry, and Peacock Feathers on that panel, making sure to overlap them to get some additional blended colors.  I put some Peacock Feathers onto some more white daisy cardstock, and then used the Sending Hugs thin cut.  I cut it two more times from white, to make it a bit thicker for my card.

I colored a corner of more white daisy with the picked raspberry and used the heart from Teddy Bear Hugs to cut that out.  I had a bit of space on the peacock feathers, so cut out another heart for the inside of the card.  And, last, but not least in the thin cuts is the mini envelope thin cut.

I did use some pumice stone on the card base, and a line on the inside of the card to bring that color inside as well.  I like how it turned out!  And no scissors, no paper trimmer!  Just thin cuts and white daisy paper!

I hope that you like my little project today!  I think it turned out super cute!  

You should dig into your stash, show us what you can do with your thin cuts!


Until next time!

~Michelle

Layered Flowers

Welcome to the Technique blog hop!  This month our focus is on layered flowers!  There are so many different ways that you could do that!  The Layered Flowers Thin Cuts might be the easiest way to do that!  I will link some other projects below, that I had fun making in different ways.  If you are following the hop, you should have arrived here from Michelle’s blog.  If you started here, that’s ok!!  You will continue around in a circle until you get back to here!  I know you will find a bunch of great ideas that you will want to copy!

So, for my card, I used a few different things!  I used the stencil from the In Full Bloom Scrapbooking workshop, the stamped sentiment from the cardmaking workshop, and the layered flowers thin cuts.

I used the stencil a few different times with shortbread ink.  The sentiment is stamped in grape ink to coordinate with the grape cardstock of the flowers.  The leaves are cut from both light and dark sides of sage cardstock.  Tof finish it off, I used some liquid pearls!  (I don’t know about you, but I tend to forget how much I like them!)

I hope that you like the card that I shared today!  I have a short video that you can watch of me putting it together, here.

I said I would link some other cards that I have made thatw ould fit for this blog hop.  I have this card here that shows how to use different colors of cricut cuts for a flower.  This one uses a different style of cricut cuts, that are similar to what I have done today with the large flower.  Last but not least, this is a whole different style, with multiple layers of the B&T paper being cut and layered.

Thanks so much for stopping by!  Next you should be going to Lauren’s blog.  Before you hop away, however, I would love it if you left me a comment about my project!

Have a crafty day!

~ Michelle

CTMH Items used:

{All items are clickable!}
H2H Watercolor Close Up

The look of watercolor, the ease of stamping!

Don’t you just love the look of watercoloring?  I do love it, but sometimes am intimidated by it.  So, when Heart 2 Heart announced the watercolor challenge, I thought it was a perfect chance to give you all an idea on how to do it, without having to feel intimidated by actually watercoloring!

H2H Watercolor Slimline Card

I grabbed the Perfectly Imperfect Patterns stamp set, that has 6 different watercolor type stamps and 2 stamps that are splattered dots, and got started!  I used the Wild Berry and Lemonade inks for my card, and just went for it!

The stamps are stamped a couple of times each, and I did overlap them, and got a light orange color in the middle.  I used the splatter dots all over the card, in first, second, third, fourth, fifth, and even sixth generation stamping!  I even added a few in Archival Black, to help tie in the banner and butterfly body.

I used the small butterfly outline and cut out of the vellum, and used the detailed small butterfly in Wild Berry to ‘pop’ off the card.

The banner and sentiment are both from the Thoughtful Critters Stamp and Thin Cut.  I stamped the sentiment on some black cardstock, used white embossing powder, and then cut with the banner thin cut.  (then trimmed off the hands with my scissors)

I used just a tiny scrap of Black cardstock to make the body.  I cut with the thin cut, then trimmed the body out with my non stick scissors.

I hope you have liked my little project!  I would love to see you participate with the H2H Challenge!  You have until the end of the month to upload your creation!  (you don’t have to be a consultant, the challenges are for anyone that likes to craft with CTMH goodies!)

I would really love it if you left a comment below!  I love to hear what you all think about my creations!

Supplies Used:

Thanks for stopping by!

~Michelle

Sometimes you just need some Winter Wonderland!

Hello crafty friends! It is another crafty challenge week at H2H! This time it is all about the Winter Wonderland! I just recently got this paper pack, and it is so fun! I wanted to make something extra useful for the holidays that are happening soon (are YOU ready?) So, I went with a gift card holder!

It’s super simple, can be used with scraps, and is great for any and all occasions! This gift card holder is beyond easy to make! Let me know if you guys make some!

Let me know what you think of this adorable little guy! Then, hop over to H2H’s blog, and play along with the challenges!

Did you know you can use embellishments in a different way?

The new challenge is up over at Heart 2 Heart Challenges is up!  This one is all about the embellishments!  This could be taken so very many different ways!  At first, I was going to do a shaker card, and then, as the card was coming together, it ended up being totally different!  I love how it turned out, don’t you?

For this card, I started with the window thin cuts.  Everything except the shutters have four layers of White Daisy Cardstock, the top and bottom have a layer of Charcoal Cardstock, and the shutters have a layer of Pewter Cardstock.  I have a piece of acetate between two layers of the window, so that I could have some “glass” in my window frame!

I ended up stamping on a piece of the Wood Texture Paper (from the Wood Grain Paper Packet, and I love how much depth it gives it!  I used two of the little sprigs from the Serenity Cardmaking Stamp & Thin Cuts. and put them on two 1″ x 1″ blocks.  I used Sage, Clover, and Evergreen inks for the foliage.

I added red sequins from the Holiday Loose Sequins (that are still available online!) with the , then some of the tiny gold glitter gems on the garland.  I decided it still needed a bit more, so I added a few lines with my black .05 journaling pen, then I added the larger gold gems to the end of those lines.

Of course, the outside of the house needed to have something on it, we couldn’t have it be just plain white!  So, I grabbed a sheet of the brick texture paper from the textures paper pack.  These bricks work perfectly!

I used Liquid Glass to adhere everything except the sequins, and for those I used Tombow Multi Bond Glue.

The card is a 5×7 card that I made from White Daisy Cardstock.  Though not shown, the inside reads “For You With Love”, from the For All Occasions stamp set.  I used a 2″ x 2″ block for that, and combined the two sentiments onto one block.

I would love to know what you think about this card!  For every share of this blog post, and comment on this post, and comment on the Facebook post with this card, you will be entered into a drawing for me to send this card to you, for you to be able to use to send to someone! (or keep for yourself!)  I will draw a winner on December 11th!  And, if you have made it this far, if you put a penguin emoji in your comment (here or on facebook) you will receive 2 entries!

Thanks for stopping by!  I hope that between myself and the other ladies, you have been inspired to join us over at Heart 2 Heart Challenges!  You have until the end of the month to participate!  I hope to see you over there!

~Michelle

Rose gold simplicity!

Have you seen the rose gold papers that CTMH carries?  There are 6 different designs, with rose gold foil on them!  They are so shiny and pretty!  They are perfect for cards, and like with a little black dress, you can dress it up or dress it down!

These two cards use the exact same measurements, but with the different papers, they look so different!  One looks a bit more ‘formal’ than the other.  I love how just changing a paper can make a world of difference!

Just look at all that shine!

These cards were first inspired by this week’s challenge over at H2H Challenges!  You should check them out!  Then, I started looking at the Make it from your Heart book, volumne 1, and pattern 20 was my starting off point!

I hope that these cards inspire you to try the Rose Gold Papers!  They are beautiful and fun!  (and so easy to use!)

Old & New, the next H2H Challenge!

Hey guys!  It’s time for another challenge!  This one was super fun to do!  It was one of those cards that changed about 15 million times from concept to finish!  Have you had that happen before?  I’ve had cards that evolve as I am making them, but not many that change as many times as this one did!

So, Old and New.  Well, I have a bunch of new(er) products on this card.  I’ll name them at the bottom, but can you find them all before you see the list?


I decided that I wanted to go with a slimline card.  I grabbed one of the old CTMH books to get a sketch to use.  Then I just went to town!  I did a bunch of stamp surgery and even more masking, and I don’t know about you, but I just LOVE LOVE LOVE how this card turned out!


I even added a sentiment on the inside of the card!  (which, I don’t normally do, but I just didn’t have enough room on the outside!  LOL!!)


This card just makes me so happy!  It’s kind of ridiculous how much so!!  LOL!  Oh! I might need to grab a pen and add a comma after coffee and glitter…. hmmmm . . . what do you think?


Oh, and the “old”  It is both the older CTMH book (retired) and the packing material that I had, to use for the coffee cup sleeves!


Thanks so much for stopping by!  I hope my card has inspired you!  If so, come on over to the H2H challenge blog and play along!  Plus, you can see all of the other designers’ creations!

~ Michelle


CTMH Items Used:

[linkdeli uuid="ef642b30-eaba-4be1-a639-540d590c7ecd"]


Pocket Card Perfection Blog Hop

Welcome to another fun blog hop!  Today we are focusing on the PML cards!  So, right now, there is a special on these fun cards, they make scrapbooking super easy, but they can also be used for cards, like I am showing you today!  So, if you got here from Darlys’ blog, perfect!  If you started here, also perfect!  The hop is a circle, so you should end up back where you started!

My card today uses a few different things!  I have the Lovely PML cards (well, one of them), the current Mix In paper packet, the Lovely paper packet, the rectangle dies, and the March Stamp of the month.  I used one of the patterns from the MIFYH V4 book (though, I adjusted it a bit to fit the 3×4 card).


This card went together really very quickly!  The Blue Belle cardstock was a bit too plain for my liking, so I stamped the butterfly wings from the March SOTM in mink ink to give it just the tiniest bit of texture.


I love how perfectly this whole thing came together!  I would love to know what you think!  After you leave a comment (pretty please!), hop on over to Lauren’s blog to see what she has for you!


Thanks so much for stopping by!


CTMH Items Used:


H2H Theme Challenge: All You Need Is Love

Welcome to another weekly challenge with H2H!  This week we have partnered up with Double Trouble Challenges!

The card that I have for you today, was super fun and easy to put together!

I had fun incorporating the February Stamp of the month in with this design!  It makes adding a bit of fun to the inside of the card, SUPER easy!

I used a bit of canary and espresso inks, and the card was done!

I added the sunflower from the Bloom with Grace Scrapbooking stamp set (which is still available!) and a sentiment from the current Card Subscription!


I used the same watercolor splash stamp to highlight two of the words on the background paper.  I thought it fit the them pretty perfectly!

I hope you like my card today!  You should hop over to play along with the H2H challenge, or at least get some inspiration!

Let me know what you think of this fun little card before you go!

CMTH Items used: